Were you blessed with gifts that let you embrace the thrill and benefits of inline skating right away? If yes, you can skip this article. I�ve written it for the wobbly or frightened folks who are determined to get rolling without inborn coordination or a useful sports history.
It's possible to build skating muscle memory without the distraction of gravity or slippery pavement. Doing certain skating movements over a period of time on a non-rolling surface can stimulate the same muscles, tendons, balance points and weight distribution as skating does.
Practice the following exercises on a carpeted surface, in front of a mirror if possible. Wear your skates and full protective gear: helmet, wrist, knee and elbow pads. If you aren�t sure how you should look as you practice these moves, see the video clips on SkateInstrutor.com.
Ready Position
Straight legs work great for walking but not for skating. To
build muscle memory for the bent-knees skating stance, stand with
your
feet shoulder width apart in your best posture.
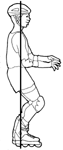 Your
spine should be stacked perfectly along its normal curves. Raise
your hands to
waist level and within view. Without leaning or bending forward,
get shorter:
Push your knees forward 5-6 inches as the joints in your hips,
knees and ankles bend. Keep your eyes forward and keep your shoulders
directly
above your hips, and hips over heels.
Your
spine should be stacked perfectly along its normal curves. Raise
your hands to
waist level and within view. Without leaning or bending forward,
get shorter:
Push your knees forward 5-6 inches as the joints in your hips,
knees and ankles bend. Keep your eyes forward and keep your shoulders
directly
above your hips, and hips over heels.
Now raise and lower your hips repeatedly, keeping your knees and
spine loose and flexible. There should be a slight resistance of
the boot against
the front of your shins as you sink, offering a comforting feeling
of stability. This low point is where you will end up after the
effective application of your heel brake.
Before moving on to the next drill, with knees still bent, try standing
with both skates tipped to the right and then to the left. You are
learning
how it feels
to
put
weight
on
your
wheel
edges, both inside and outside edges. This type of muscle memory
applies to your future turning skills.
Return
to Top
Falling Down and Getting Up
Indulge
in a pain-free, controlled fall to test your knee, elbow and wrist
guards. Starting from a ready position, bend down and
put your hands near your toes. With fingers raised, reach forward
until you topple onto your hands and knees.
Bounce your knee and
elbow pads on the floor a couple more times. Doesn�t that cushion
feel good? If not, consider paying more for gear with thicker padding.
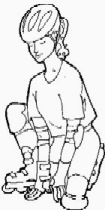 To
get back up, move both hands close to your feet and between your
knees. Lift one knee and place that skate flat. For added security,
press your elbow and knee together. Pressing both hands on the ground
for support, raise the second knee outside the elbow so you end up
in a deep squat. Right
about now, you should look like a frog. Lock your skates into
a V or T shape to prevent rolling (likely on pavement) and then unfold
upwards.
To
get back up, move both hands close to your feet and between your
knees. Lift one knee and place that skate flat. For added security,
press your elbow and knee together. Pressing both hands on the ground
for support, raise the second knee outside the elbow so you end up
in a deep squat. Right
about now, you should look like a frog. Lock your skates into
a V or T shape to prevent rolling (likely on pavement) and then unfold
upwards.
Fall down and get up as much as
you want on your
carpet. Later, make it
a point
to
repeat this
on an
uncarpeted
surface
several times
to
build
confidence
in your gear before heading outdoors.
Return
to Top
Braking stance
You need the Ready Position's well-bent
knees for effective braking. With straight knees,
you won�t
be able to apply as much pressure and friction to the heel brake
because
you lack proper leverage. Practice these movements to see
what it feels like to have your weight distributed properly for the
most effective braking stance.
 Settle
into a relaxed ready position with knees well bent and hands
in view.
Settle
into a relaxed ready position with knees well bent and hands
in view. - Shift most of your weight over the brakeless skate (your
support
leg) so the braking foot feels light.
- Slide the skate with the brake slowly forward 8 inches, but
keep the full weight of your ready position on the back, support
skate. From
the side
view, your lower legs should form a triangle.
- Make sure your
skates are parallel and no more than 4 inches apart so your toes
are both
pointing forward.
When you don�t raise the toe, this is called
a Scissors Stance: low, narrow and long. Raise and lower
your body several
times over that single support leg. Don't stop until you
can feel your thigh muscles begin to burn in that one leg. Dropping
your hips builds valuable muscle memory for the final move that will
someday
complete a heel
brake stop.
If you feel balanced enough, try the up and down motion with the
braking skate�s
toe lifted.
Return
to Top
Turning motion
 Stand
so that your wheels are parallel and your skates are set wider than
shoulder width. The wider the stance, the more
stable you will feel and the
easier
it
will be to make
the
basic A-Frame turn once
you try this on pavement. Never fear, after you build muscle
memory through a few successful turns
with this very wide stance, you can easily
translate
that
to a more natural width.
Stand
so that your wheels are parallel and your skates are set wider than
shoulder width. The wider the stance, the more
stable you will feel and the
easier
it
will be to make
the
basic A-Frame turn once
you try this on pavement. Never fear, after you build muscle
memory through a few successful turns
with this very wide stance, you can easily
translate
that
to a more natural width.
- Keeping your spine upright in its natural curves, bend your
knees and raise hands within view at waist height, both arms
outstretched. This
reproduces
the starting position for a turn, when you
are simply coasting forward.
- Rotate
your head, shoulders, ribcage, and outstretched
hands toward the left. Keep your helmet centered over your
feet, being
careful
not
to lean or shift your weight to the left skate.
When done properly, rotating left will add pressure to the
right skate and cause it to tip onto its inside wheel edges.
- Now come
back to
center and rotate to the right so the left
skate tips inward and feels
heavier.
Notice that the knee moves slightly inward in the same
direction as the skate
tips.
- Repeat looking around to the right and
then to the left and feel the tipping and changing pressure
inside your boots.
On pavement with a little momentum, the simple movement of looking
where you want to go without unnecessary muscle tenseness will
accomplish an effortless turn.
Return
to Top
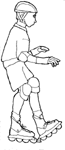
Striding motions
The basic stride is all about keeping your feet close under your
body so you can stay in balance and control. To make in-line skates
go forward, you must push off from your inside wheel
edges.
Practice the Duck Walk on a plush carpet
to get used
to both feelings without the distraction of a glide.
 Starting
position: Assume a V-stance (toes
out, heels touching).
Starting
position: Assume a V-stance (toes
out, heels touching).- Marching in place: Standing in place, lift
one skate at a time, shifting your weight right, left, right, left.
Take
care to keep your V-Stance
at each
setdown.
- Duck Walk: Relaxing your inner ankles so both
skates tip slightly onto the inside wheel edges, begin stepping
forward, advancing
each skate a few inches ahead before setting it down right under
your navel. The weight shift with
your
feet so
close together may
cause you to waddle
like
a duck (thus the name).
- Remember to keep those knees bent in the Ready
Position! You may be jerky at first, but this will smooth out
as you
gain confidence.
- Feel the pressure along the
inside of your foot as you push against each skate�s inside
edges to move forward.
- Try to set each skate down so
the back wheel is right below your navel and just two inches
ahead of the middle wheels of the front skate. This helps head
off the
habit
of an
unnecessarily wide stance.
Physical momentum is what turns hesitant skate stepping into real
stride and gliding. The same commitment to forward momentum is what
turned our first jerky baby steps into real walking. Here's a carpet-safe
way to turn your stepping into gliding. Make sure you have a few yards
of clear carpet ahead before you start.
- Assume your best Ready Position.
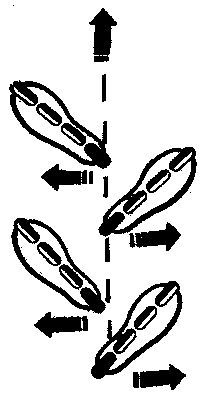
- Take
one Duck Walk step so your skate wheels are perpendicular to each
other as shown in the diagram above: this is the T-stance.
- Tip the rear skate onto its inside wheels.
- Press against the rear
skate until your forward skate begins to advance. Let
your upper body move forward with the front skate in a glide of
3-4 inches at most.
- When the back skate gets light, lift and set it back down in a
new T-stance right under your navel.
- Repeat, starting
each stroke by pushing against the inside edge of the back skate�s
wheels.
It's important
to try and close the gap between your skates as much as possible
before you start each new stride. Otherwise,
you will end up
lurching
around
looking like a modern day Frankenstein.
Return
to Top
Now what?
Carpet skate
for half an hour three times a week until you feel ready for
a rolling surface. If you're still nervous about the great outdoors,
this might be your clean kitchen or garage floor, where
many a skater has gotten her start.
From there, you should advance
to a smooth, empty parking lot that looks flat. Avoid bike paths
and intersections until you have mastered all the basic turning,
striding and stopping skills that ensure your safety.
Last tip: Consider a lesson! There are certified instructors all
over the US and internationally just waiting to help you.